Page 1 of 25 1 2 3 4 5 6 7 8 9 10 11 ... LastLast
Results 1 to 10 of 244

Thread: Project Q - Sams 86 (many tech Pics)

  1. #1
    Elite rthy's Avatar
    Join Date
    Dec 2008
    Name
    Leo
    State
    VIC
    Location
    Tulla
    Country
    Australia
    Posts
    7,305

    Default

    <div align="CENTER">


    </div>


    This is my thread which has now been copied over for a third time, so if it doesnt make sense that's why.

    I wanted a good all round package that has limited compramises, here's what I had in mind for it compared to standard:

    - More power

    - More Torque

    - More braking power

    - More cornering ability

    - More predictable

    - More reliable

    - More rigid

    - Enough room to still fit my bike in the back.

    - Nicer suspension ride (by my personal taste)

    - More comftable

    - Better looking

    - Nice stereo with some bass


    the list goes on, basicly I wanted a daily driver that equiped well enough to go on a circuit should I choose to.

    Also this has had the suspension tuned to eliminate oversteering, this is not for drifting!


    Lastly I have tried to make the pictures as detailed as possible so that other people can learn from what I am doing. I am happy to help people and I don't beleive in keeping car secrets, so if you have a question about anything I am doing then ask me here.
    30kw club

  2. #2
    Elite rthy's Avatar
    Join Date
    Dec 2008
    Name
    Leo
    State
    VIC
    Location
    Tulla
    Country
    Australia
    Posts
    7,305

    Default

    Anyway heres the specs that I currently have or I am planning to have:


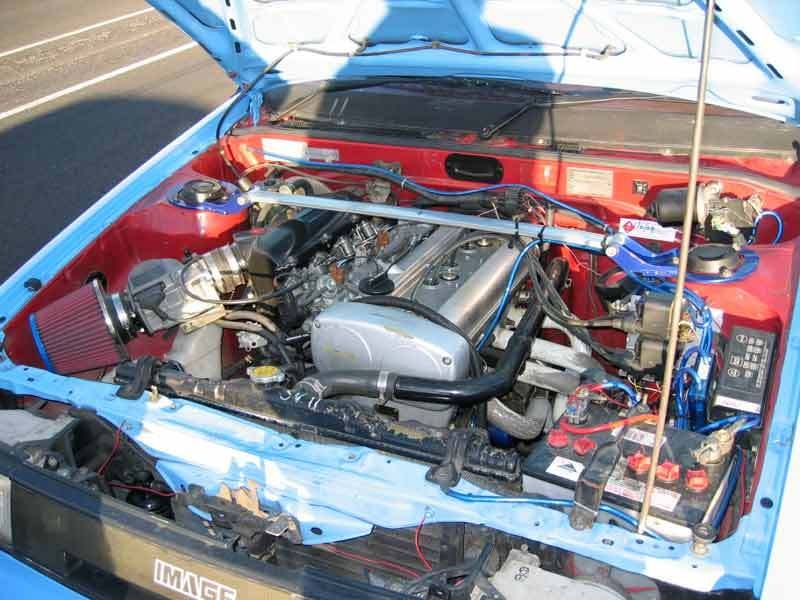
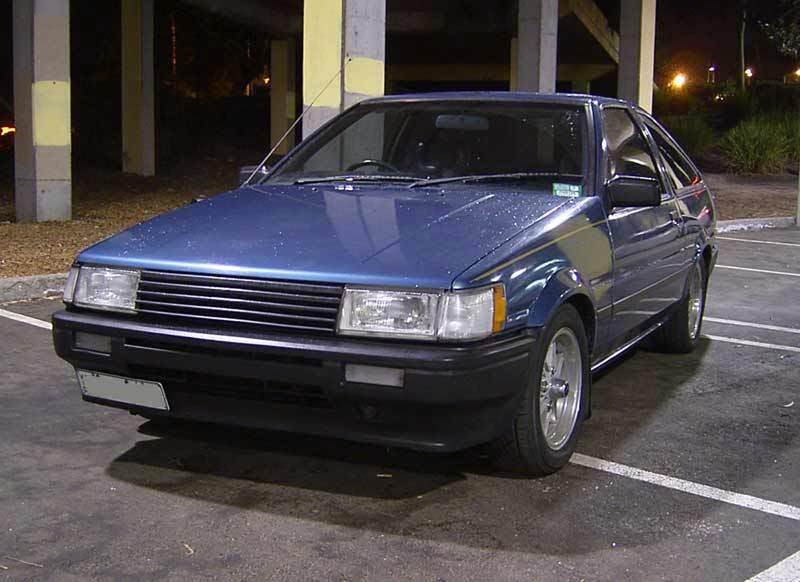
    Engine: Toyota 4AGE 20 Valve Silver top


    Clutch/flywheel: 20V flywheel and exedy 212mm clutch


    Induction: Factory quad-throttle bodies, custom made inlet trumpets with a custom airbox sucking through a K&N pod filter


    Gearbox: T50 with custom short shifter
    Planned gearbox mods: Installation of an oversized Delrin Shift Bushing and also a change of gear knob.


    Diff: T-18 with disks with 1 : 4.1 TA-22 diff gears
    Planned Diff: Current T-18 with TRD 2-way LSD center. With also custom stroke limiting rods.


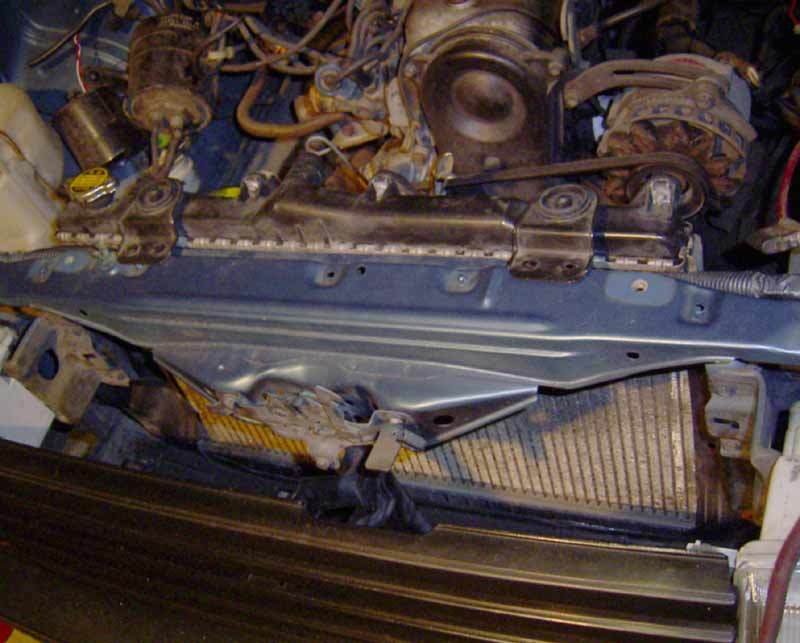
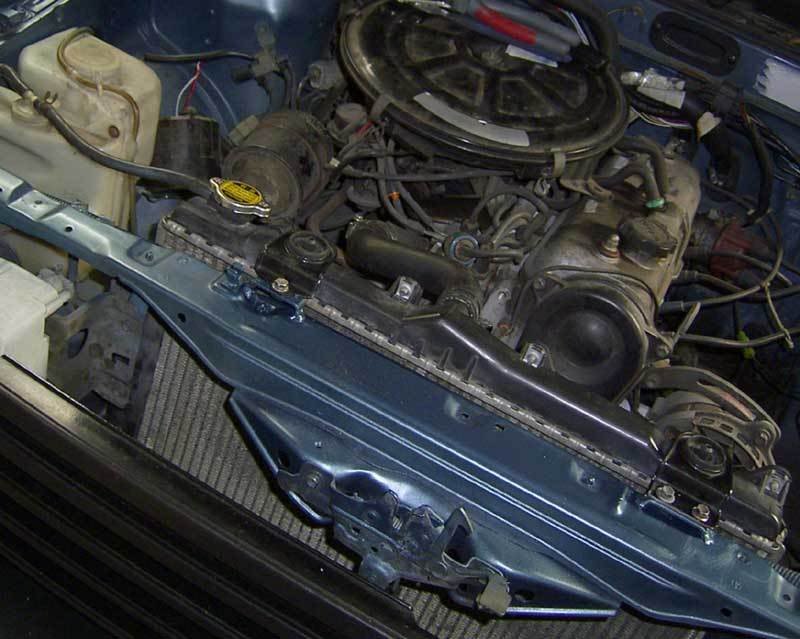
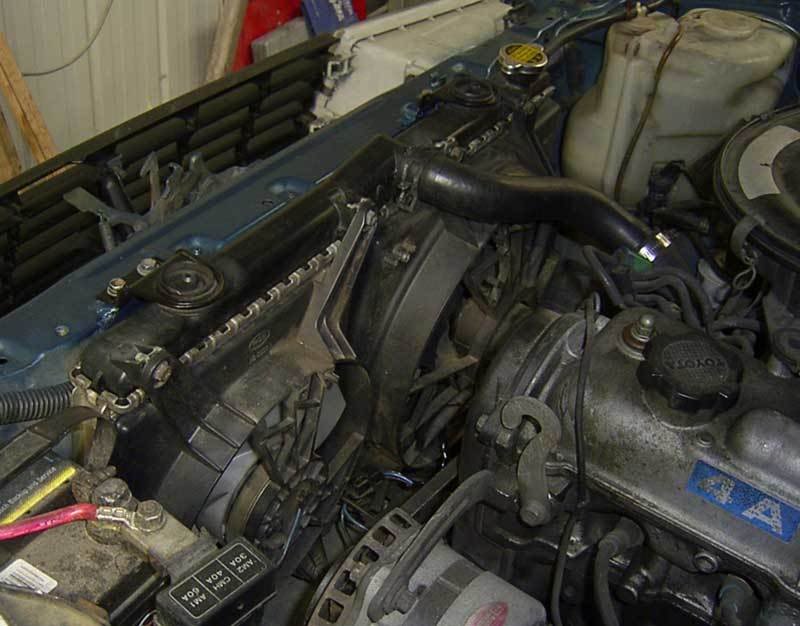
    Radiator/fans: Hyundai Excel with modifed hyundai mounts and one of the two OEM fans, which is the former air-con condessor one.


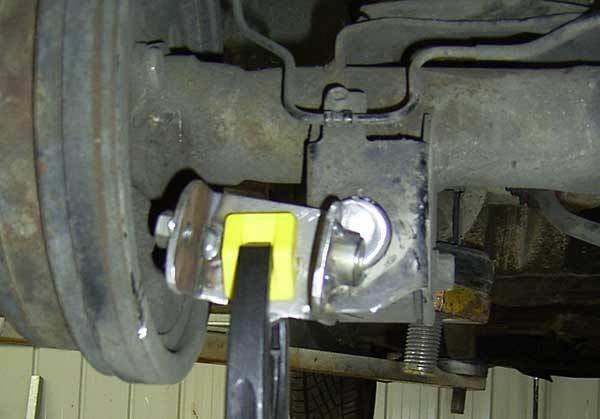
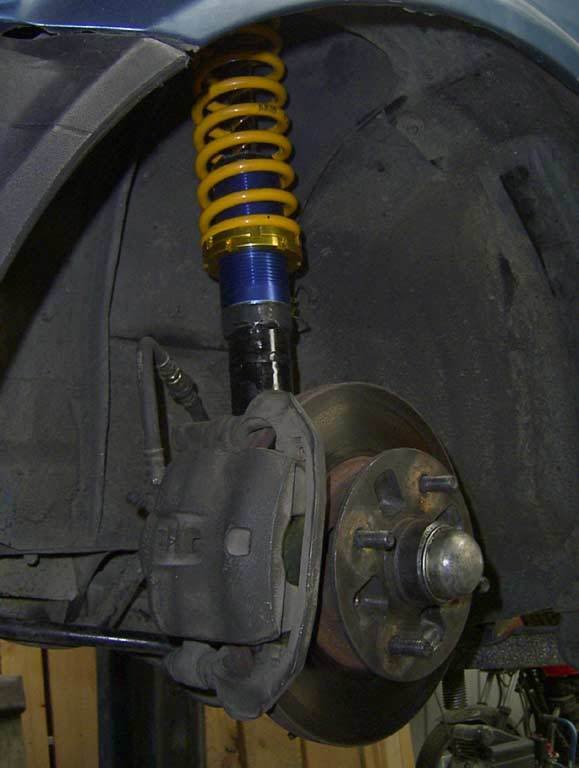
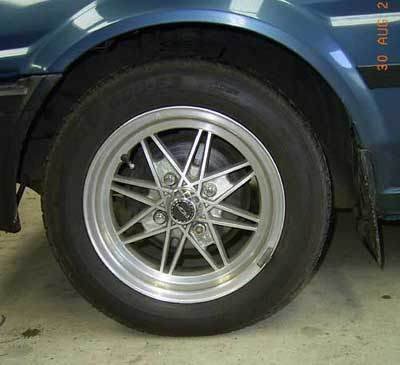
    Front shocks: ST-204 4-way externally adjustables by KYB: AGX


    Rear shocks: Modified Commodor IRS 8-way externally adjustables by KYB: AGX


    Front Springs: Kings 65mm I.D coilover type, 275 pounds/inch (4.9 Kg/mm) 200mm long, Linear spring


    Rear Springs: Custom whiteline, approx 60mm lower than standard, approx 180 pounds/inch (3.2Kg/mm), progressive spring.


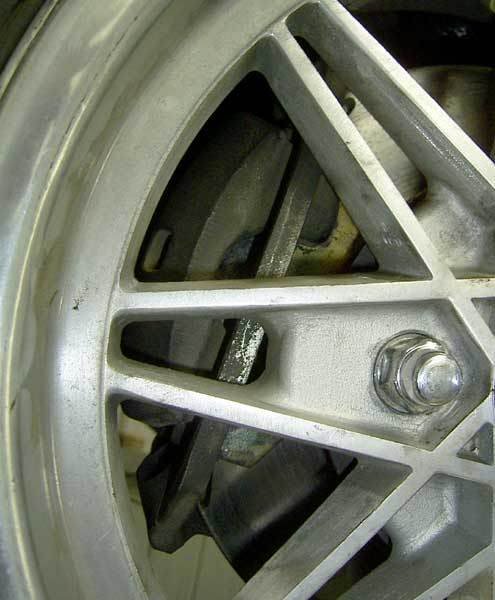
    Front Brakes: MK2 Supra vented 260mm


    Front Brake Pads: QFM organic sport pads


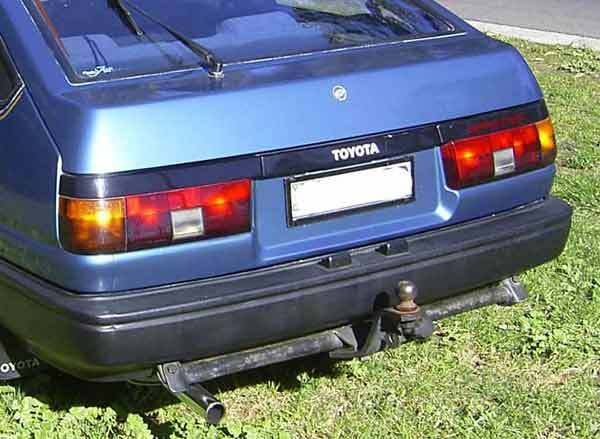
    Rear Brakes: ST-141 280mm disks with AE-82 corolla calipers.


    Rear Brake Pads: Ferodo extra soft - low temp.


    Pan-hard Rod: Custom made adjustable


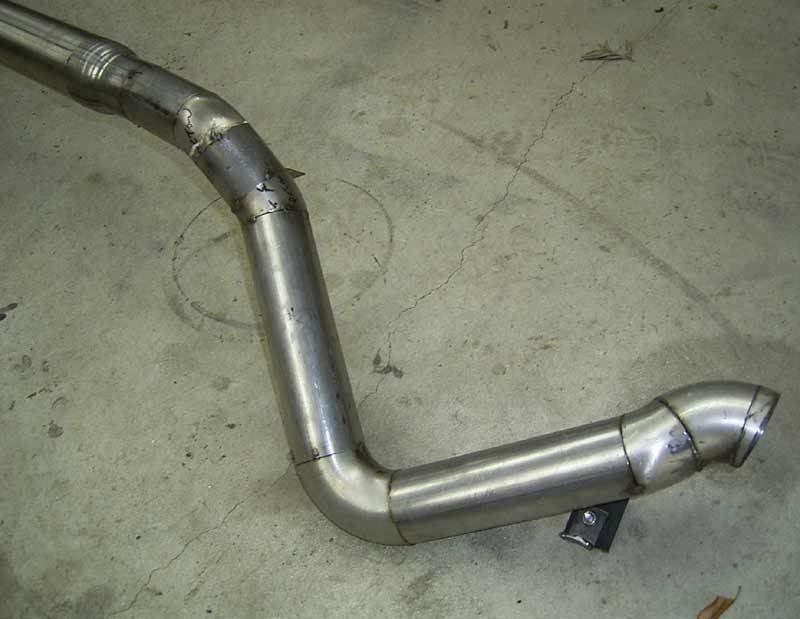
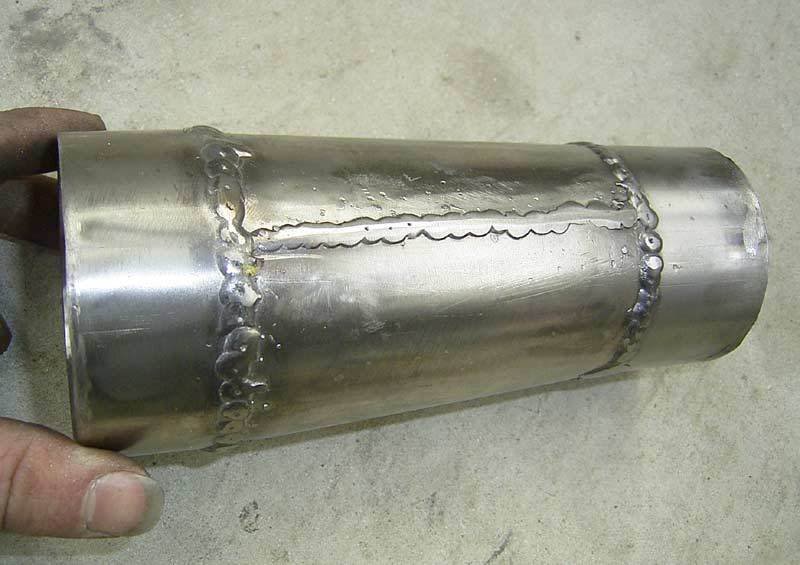
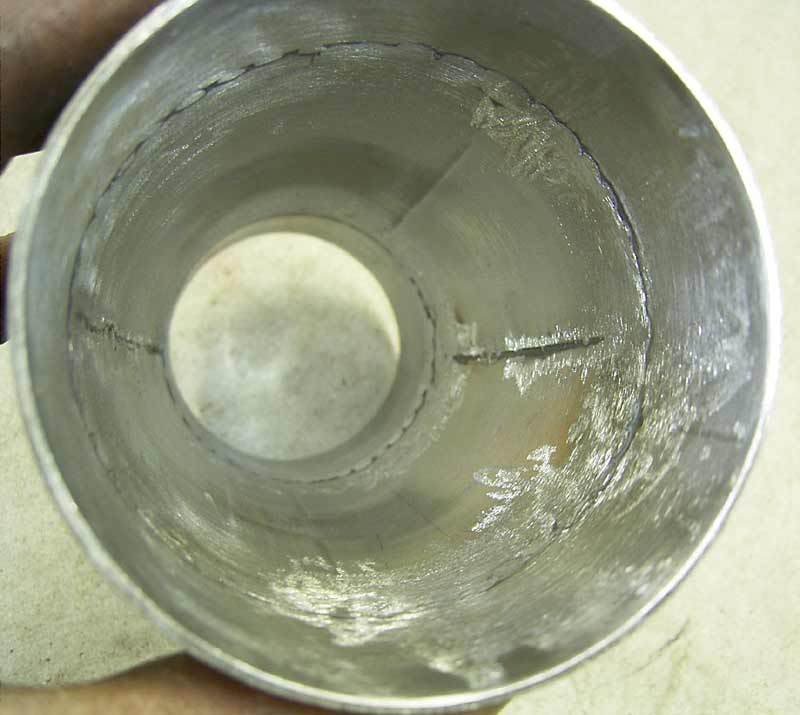
    Exhaust manafold: custom made, stainless, true equal length and equal diameter extractors, 4 to 2 to 1, 50cm primaries and half length secondaries.


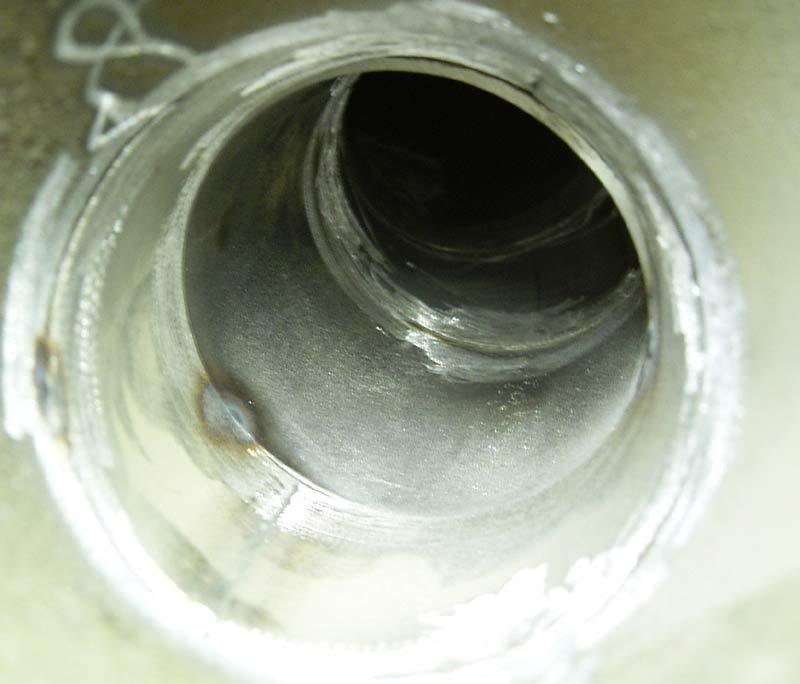
    Exhaust: fully deburred, mandrel formed, stainless steel system which is 2 1/4 inch. Middle metal cat that leads to an angled straight through stainless muffler with a chrome tip.


    Ignition: OEM 4AGE 20V ECU in conjuction with modifed loom and custom waste spark ignition.
    Planned ignition (second stage): 2 x Twin channel M&W ignitor modules with individual coil packs for each cylender.
    Coils type: 4AGZE


    ECU: OEM 4AGE 20V ECU in conjuction with modified loom.
    Planned ECU (second stage): Wolf 3d 3.1 (already have)


    Stereo:


    Heat-unit: Clarion MP3

    Front speakers: Jaycar response 4 inch

    Front Tweeters: Ex OEM

    Rear speakers: Alpine 6 x 9s

    Amp (sub only): Cadence

    Sub-woofer: Reactor

    Woofer enclousure: Custom

    Other bits: Composite parcel shelf and fader control adapter to be woofer level control.
    30kw club

  3. #3
    Elite rthy's Avatar
    Join Date
    Dec 2008
    Name
    Leo
    State
    VIC
    Location
    Tulla
    Country
    Australia
    Posts
    7,305

    Default

    Heres what my car looked like when i first bought it:


    Now one of the first things I did was to take the imobilisor off to put an alarm with remote start on, When I take everything apart I found 2 complete imobilisers and I was left with this nightmare half way through:


    That ball of black wires to the bottom right was the main one that was in use, I took it out carefully and is now installed on my friends Sylvia. I will never do an alarm ever again!


    Next up I had to do something about the height, it was beyond a joke so I lowered it, heres a before/after:


    Bye bye 4 x 4, hello to it being dropped to the floor! And remember kids always use a safe and legal method to lower cars (hides angle grinder )
    30kw club

  4. #4
    Elite rthy's Avatar
    Join Date
    Dec 2008
    Name
    Leo
    State
    VIC
    Location
    Tulla
    Country
    Australia
    Posts
    7,305

    Default

    UPDATE: This was for when I was aiming to have a 4AGZE turbo hence the large pipe size, this is now very regretfully for sale.


    Over the last few days there has been a strike with a picket line at my work which I was expected to be on, so what do I do? work on my car of course! Anyway I started by moving my original exhaust so it doesnt cross over from one side to the other and also so that it finishes before my diff. This leaves the other side completely free and allows my new exhuast to be fitted all the way to the back of the car. It starts as a 3 inch pipe and just before the diff it reduces down to 2.5 inch, all stainless, all equal length diameter bends and with no burrs or steps or intrusive welds.

    It took me like 3 days of tedious work but heres what I ended up with:


    thats the 3 inch flex pipe at the front which I am hoping wont melt as I am expecting for part of this exhuast to start glowing red at times.


    Heres after it has reduced to 2.5 inch where it goes up and over the diff, this part alone took me so many hours. That handbrake cable will obviously need to be held well away.


    Taken out of car, notice the reduction in pipe size, although it looks bad on the outside the inside is nice and smooth and ontop has been ground and sanded for even better flow. On the end of this pipe is where I plan to attach my 2.5 inch stainless magnum stainless straight through muffler. If theres wasnt a turbo at the start of this it would be unbearably loud.


    A view from the inside, notice how theres a pair of grind marks on each join to match the pipes together, this is one of the reasons it took so long. As for the top while it looks like thres a step there there really isnt, its just an optical illusion.

    I only tack welded it together for now, that because if I weld it fully not only will it be rough and potentially burn though it but it will also be gaurenteed to leave weld protrusions on the inside. So when I can I will be getting a friend to Tig weld everything together.

    I know have one less problem! I managed to make a 3 to 2.5 inch reducer, it was suprisingly easy and most of the time was doing some internal die grinding to get it smooth. The difference over my previous one is dramatic, I dont know how many degrees it tapers down but its not much. took about 3 hours which for me isnt much compared to how much I was going to spend on it.


    What i did is get a 3 inch pipe and mark out the sections needed to be taken out to make it taped down to 2.5 inch. I cut those sections out and then welded it, I ended up with this:


    I welded the whole thing myself because I can get to the inside to grind it which I did do to grind it smooth with my die grinder.


    after that I did some more cutting and shaping before welding the end fittings on, heres the result:


    it doesnt get any more gentle than that!


    I spent ages making the inside as smooth as possible with no steps at all, heres a pic:


    it still looks a bit rough but running my finger over it its all very smooth with no protrusions


    right now I have my exhaust system out of my car so when I get my muffler I will put it back in and fit this adapter, I will take a before after pic to show how dramatic the difference is.
    30kw club

  5. #5
    Elite rthy's Avatar
    Join Date
    Dec 2008
    Name
    Leo
    State
    VIC
    Location
    Tulla
    Country
    Australia
    Posts
    7,305

    Default

    heres my September 18 update:

    got another peice in the mail today here it is:


    its a VL Turbo fuel puheres my September 18 update:

    got another peice in the mail today here it is:


    its a VL Turbo fuel pump which at free flow is rated at about 280Kw worth of fuel so it should supply enough for me when its under pressure. I sourced it through the forums and I will mount it under my car above the diff as soon as I can.


    I made an interesting discovery today, and that is that I have room for a 2.5inch surge tank (AKA swirl pot). I didnt think initially that I had room for it so what I was going to do was to take my fuel tank out and get it proffesionaly modified to have a cup and a few baffles inside of it. This would of been a hastle and costly. But now I am going to fit a surge tank and get a second fuel pump.


    UPDATE: Looks like its back to plan A, I dont think I will use this tank but instead get my tank modified, it amoungst other things saves me having 2 pumps.


    so this is what I ended up putting in:


    this is going to be my surge tank, no prizes for guessing that I used a bit of leftover stainless exhaust pipe. To the left is the pan-hard rod and its mount, and behind that is the diff. To the Right is the fuel tank and all lines coming out of it. Its a tight fit but it should be ok. The total volume I have worked out to be is 500cc, if I am not mistaken this works out to 20 seconds worth of fuel when I am using 200KW of power, so yeah I dont think I will be going around a corner longer than that. I will need to obviously fit a top and bottom cap and also buy and fit all the fittings to it.

    heres where the secondary pump will most likely fit (the VL one):


    I plan to have the pump mounted about there and the other pump above it. I also plan to make a full removable cradle that holds all this in place. This picture really shows how I am squeezing all my gear between my panhard rod and my fuel tank.

    Also of note here is the fuel pump mount I made. I used some leftover exhaust pipe and some industrial tubing. I wanted this to insulate some of the vibrations of the fuel pump
    30kw club

  6. #6
    Elite rthy's Avatar
    Join Date
    Dec 2008
    Name
    Leo
    State
    VIC
    Location
    Tulla
    Country
    Australia
    Posts
    7,305

    Default

    I picked up some more bits from the self serve wrecker today, here they are:


    a 1991 Hyundai Excel radiator with fans and...


    an AE-82 corolla remote thermostat housing. I need this thing because the cooling system on my engine is designed for the front wheel drive layout it used to have. So when I convert it to a RWD I cant use most of the existing cooling system. I need this to put a thermostat inline.

    I bought the radiator to upgrade my cooling system as a just in case measure. As a bonus I should be able to sell my old one off easy enough. I normally dont go in my garage much on a Sunday but I had a quick tinker and I managed to do a dummy fit. As advised by the toymods forum the excel radiator was a good match and they were right, the results are shown below:


    To fit it I chopped off the original mounts on the car bodywork and I will be using the original Hyundai mounts. Looking at the pic the mounts are just sitting there, I will need to attach them somehow, but thats easy. For the bottom hose I used the original sprinter item which was a very close fit and with the hose being pre-heated a bit with the heatgun it went straight on. The top will require a bit more attetion but still it wont be too hard. Overall the radiator is a few CM longer, a tad higher and almost twice as thick. So it would have almost exactly twice the volume. Also the cooling fan setup is significantly better. I will need to work out how to control the fans, in the meantime I will have either nothing or a manual over-ride.

    Also of note is that I managed to lower the radiator, this means I then use up more of the opening on the bottom and it will mean I can effectivly sit the intercooler lower.


    The bottom hose had already been taken care of, but on the top the inlet of the radiator and the outlet of the water pump were different sizes. I did however notice that the hose from one very nicely slid over the other. So what I did first up is use part of the sprinter OEM hose for off the water pump and the Hyundai one off the radiator, I trimed them down untill they fitted together nicely with them overlapping each other i the middle. I was happy to find it fitted very nicely together. From here I choped off an aluminium peice of pipe and jammed in into my smaller pipe off the radiator, again with some assistance from my heatgun. Like so:


    from here the larger hose slid over the top and the aluminium insert was used to provide a support for the hose clamp that held the two together. Besacuse I had to use the heatgun to put the incert in I wont ever have to worry about it moving around, it just in there way too tight.

    After it had all been done up:


    There, looking like it was made to be fitted that way!


    I made the brackets that the Hyundai OEM radiator mounts will screw into. I welded them on and spray painted them from an expensive colour matched metalic spray can I had laying around. Also as per usual I used toyota OEM bolts to hold it down to further the original look and practicality. Heres how it looked:


    Also notice how the oginal overlfow bottle hose on the top left looks like it was made to fit on.

    Lastly a pic from the back showing how nice it fits:


    I also started on my electrics and I am still working on that, I will show some pics when I have done it. I am still thinking of what method I am going to use on this, one thing for sure is that I will have individual relays for each fan, and its almost certain I will have a switch mounted next to them for the manual overide.


    UPDATE: Since my change of plan to get a 20 Valve non turbo I have no need for such an excessive cooling system. I havn't bothered to wire the fans on this thing up yet and I have been driving for like 2 months as is. Only after sitting it traffic for ages does it slowly warm up a bit, and it really drops quick as soon as it gets some airflow. It really is amazing how well it works. Anyway my point is that this isn't necessary for my plans anymore and I have decided to take off the larger fan. Ones more than enough and with the larger one gone it will free up some room. I guess I will take another pic once I take it off.
    30kw club

  7. #7
    Elite rthy's Avatar
    Join Date
    Dec 2008
    Name
    Leo
    State
    VIC
    Location
    Tulla
    Country
    Australia
    Posts
    7,305

    Default

    I installed my rear AGX shockers into my car. Heres how I did it:


    This is the orginal design, an eyelet style with a bolt through the middle. The shockers I am fitting are almost identical with the exception of a 40mm shorter stroke and with a different bottom mount.


    The Commodor used a realy primitive and stupid setup to hold the shocker in, its held in by one side only with a bolt thats aproximetly 13.5mm in the shank. To comensate for the pathetic design they used a big, heavy cast iron mount to fix it to. If that wasnt stupid enough they used a bolt with a rolled thread and a shocker that has a 15mm hole in it. So basicly all Commodors have heaps of slop in the lower mounts and rely on bolt tension to hold them captive. So what I did is get a spacer machined up which I pushed in. This is to reduce the diameter from the 15mm down to suit a common 10mm bolt. I decided to have a single bolt going right through.


    Heres the deisgn I came up with, it uses 3mm plate. It uses a 10mm hex head bolt with a cylender shaped head. To stop any slop forming I welded a nut on one end and put a thick section of pipe to support the head at the other end. So I have the equivolent of about 10+ mm of material at either end of the bolt. Very simple, light and effective. In this photo I had chopped off the original mounts and was ready to weld mine on.


    All welded up and painted. Looking here you see that I drilled 4 holes through the middle which I used to weld, I also welded from all the edges.


    This is the top, the shocker was the same at the top however the bushes supplied with it were slightly different. Fitted into place the bushes show themself to be larger but it isn't a problem. To fit the covers I just pulled the inter peice of trim up a bit to clip them on. Once in place its indistinuishable.


    All finished with the shockers mounted and ready to use.


    Testing: It was a bit hard to test because I was experiencing front shocker problems at the time and I am using standard springs temporarily, however I found the new shockers to be awesome. From setting 1 it feels like a well worn standard sprinter item, to 8 where the whole car feels very well dampened. I recomend this to just about any sprinter driver who has the equiment to do it.
    30kw club

  8. #8
    Elite rthy's Avatar
    Join Date
    Dec 2008
    Name
    Leo
    State
    VIC
    Location
    Tulla
    Country
    Australia
    Posts
    7,305

    Default

    I have started to make myself a custom grill for my car. I think the standard grill on a sprinter is such a let down and is way too sedate. Anyway I have managed to source a second grill which has already has been chopped to fit spot-lights. Being already hacked I have no problems expementing with it. That way I still have my stock grill put away in a safe place. What I plan to do is to chop the middle out, mould some plastic edges on it and then put a black mesh in the middle, but set back in the grill. In the middle I will make my own levin logo. I have already cut and shaped the letters out of 5mm aluminium which took a while. Heres how it turned out:


    I am not sure yet how I will attach them to the grill but I will work it out.


    I have had a bit of a setback, a pictures worth a thousand words:


    I was happy to get my car running after having the suspension out for a while and I was out giving it a test run when I heard the engine sudenly make an ugly noise. I managed to limp home ok. After much cursing I eventually pulled the head off and found it had blown the gasket between the last two cylenders. I bought a gasket, put it in and put it back together. During a test drive it felt good (relativly speaking, its still a bloody 4Ac) but when I came back it was making a hissing sound. Looking at where it was leaking it apeared it was coming from where the coolant return pipe comes off the back of the head, crap! So now I am unsure what I will do. I am thinking of pulling the transmission out, because I have a spare and I want to try it out, so when I change it it will give me a good chance to get to that pipe, effectively hitting 2 birds with one stone.


    My car is finally back on the road, but what a drama it was. I did end up taking the transmission out and I appled some gasket sealer to that pipe and also cut myself a gasket. Putting it back together it still leaked. So it was taken off again, fully scraped back to metal, cleaned up and ordinary silicone applied. It was bolted back up and it held tight, so much for the proper way. Anyway I decided to fit a spare T50 gearbox that I had that had ben sitting in the rain for atleast 4 years. So with Kev's (Phrostbyte) help we put it back in and connected it all up. Testing it out I realised it still needed some more work down, but the actual gearbox was in very good condition, which was fantastic, and no my spare T50 isnt for sale!

    I also bought myself another steering wheel, so Kev will be getting my old one with an old boss kit i made a while ago. I will fit it as soon as I finish making the boss kit.
    30kw club

  9. #9
    Elite rthy's Avatar
    Join Date
    Dec 2008
    Name
    Leo
    State
    VIC
    Location
    Tulla
    Country
    Australia
    Posts
    7,305

    Default

    Another thing I have made/assembled/fitted: my bigger brake coilovers:


    The specs are as follows:


    *ST-204 Celica GT4- KYB AGX 4 way externally adjustable shockers.

    *MA-61 Celica Supra Brakes- 280mm vented disks with a massive calliper.

    *RA-28 Celica struts- shortened 60mm with bottom seat replaced with Fulcrum 65mm coil-over collars. Also bottom side ground down partially to make clearence for brake calliper.

    *RA-28 Celica brake caliper mounts: Severly modified to be used a a new mount for supra brakes. Original plate was cut right down and a new design mount was welded in place.

    *RA-28 Celica spring tops: Severly modifed to not be a spring top anymore but instead be a retainer for the new aluminium coil-over spring tops.

    *AE-86 strut tops

    *250mm long free height, 150 pound King Spring- This is no good for me and will be replaced by a 200mm long, 325 pound King spring.


    Notice the lack of clearence between the caliper assembly and the rim, theres approximetly 4 to 5mm gap:


    This isnt finished, heres what I plan to do still:

    * I have had some ADR approved stainless steel brake lines made up for better feel so I plan to fit them once I am used to my better brakes so I know what the difference really is.

    * A new custom clamp for the brake line on the strut.

    * Paint the callipers in some 1200 Degree paint (red) I have.

    * New brake pads. the current ones are like new but I want some sport pads for increased bite.

    * New camber tops to allow for that adjustable camber which is missing from the factory. I will look for alternatives before using this as they are very expensive.

    * 200mm, 325 Pound King Springs


    Heres my custom brake brackets, it was very hard to take a decent shot of these so I had to touch it up heaps in photoshop, hence the noise.


    I shaved a bit off the bottom of the strut where the red arrow is pointing. That edge used to be rounded between those two bolt holes, hence why there is a step that comes up. As u can see it was shaved back to make room for the plate that the caliper is supported by. From the photo what I did looks rough and not that strong, but it's quite the oppersite. I made it just about indestructable and then suported it a bit more.

    For the brake bias its an issue that many overlook. Right now I have too much front bias, as in the front will lock up too early. I will fit a Wilwood brake bias adapter to whichever line needs it; front or rear. It needs the restriction on the front right now but that may be reversed once I fit the rear disks with the new diff. So I will wait till that is fitted and then see what happens. Its funny to hear that someone could pay $2500 on a rear disk conversion and then have bad braking power.


    Also another shot of my new brakes, here u can see how my caliper is a nice fit and also how the disk hasnt been worn in yet. Also I have since painted the calipers red.

    30kw club

  10. #10
    Elite rthy's Avatar
    Join Date
    Dec 2008
    Name
    Leo
    State
    VIC
    Location
    Tulla
    Country
    Australia
    Posts
    7,305

    Default

    I changed some more bushes again, this time for my 5 link rear end. I only changed the ones for 3 of the bars because I have been advised that changing the top passenger side on is not a good move and the panhard rod was already done. However I normally lift the car from where the top bush is located so knowing someone who has a hoist proved useless to me. Its a damn good thing I bought a high lift jack the other day. Hes what I ended up doing:


    nasty!


    well I took temporary possesion of this guys car I am getting my 20 valve from. I started with this:


    now this isnt my picture so no comments about the shadow!

    I in one night starting at about 8Pm got to this stage:

    30kw club

Page 1 of 25 1 2 3 4 5 6 7 8 9 10 11 ... LastLast

Similar Threads

  1. Parting out: Silvertop 20V AE71 Spirit project - Pics added
    By beerhead in forum Car Parts For Sale
    Replies: 20
    Last Post: 31st July 2007, 03:50 AM
  2. tech question: DIY 4age cut n shut inlet manifold?PICS
    By slidn70 in forum Technical - Questions
    Replies: 2
    Last Post: 20th June 2007, 01:56 PM

Posting Permissions

  • You may not post new threads
  • You may not post replies
  • You may not post attachments
  • You may not edit your posts
  •