Page 2 of 25 FirstFirst 1 2 3 4 5 6 7 8 9 10 11 12 ... LastLast
Results 11 to 20 of 244

Thread: Project Q - Sams 86 (many tech Pics)

  1. #11
    Elite rthy's Avatar
    Join Date
    Dec 2008
    Name
    Leo
    State
    VIC
    Location
    Tulla
    Country
    Australia
    Posts
    7,308

    Default

    I also fitted some new sports pads from a company called QFM and repainted my calipers, looks alright I think:

    30kw club

  2. #12
    Elite rthy's Avatar
    Join Date
    Dec 2008
    Name
    Leo
    State
    VIC
    Location
    Tulla
    Country
    Australia
    Posts
    7,308

    Default

    I started to make my extractors, to measure it up right I in my shed put my engine on a brick and attached my spare gearbox and starter. With this in place and with my other extractors laying around I used this as a rough guide to where my pipes should go. This wasn't enough though and what I did instead is compare where the exhuast ports were on the head compared to the single cam engine I have now. I found that by taking my dizzy cap off, clutch line off and alternator out of the way I could put it into the exact position I needed. Still bloody hard but doable.

    Well I found out its increadibly hard to get the position right, harder again to shape the pipes right to fit together perfect and almost impossibly hard to get the length exactly right. Well anyway after alot of pain I managed to get it almost right with 3 of the 4 pipes.

    Heres some pics, theres some blur though, flashes and shiny stainless pipes don't mix.


    well I have finally finished the hard part of my extractors and what a job it was to make them, they are all identical length according to my measurements, and they are of a true equal diameter design. The primaries worked out to be a very long 50cm which apparently is good for low down power. Anyway here they are with some temporary paint on them.


    A quick update as a few things have happened:


    - I have to return my custom rear springs as they are 30mm off from the height I asked for, I like having a low car and its staying that way.


    - I bought some ST-141 rear disks which are a huge 280mm diameter and also some some AE-82 twinky calipers to suit. They require some custom brackets to suit once again but I would think they would be easier than what it was for the front of my car. This will mean I will have 280mm disks all round but with vented on the front and solid on the back, total overkill but yeah thats me.


    - I had some more braided lines made up, one brake line for my rear brakes and also a clutch line with a bango fitting on one end instead of standard. What this means it comes off the slave cylender at 90 degrees instead of straight on, this means its out of the way of the exhuast. I will have pics for this in due time.


    - It looks like I will be rear suspension travel limiting devices in. I desperatly need something to keep my rear springs captive as right now the chopped OEM ones are very loose as it is and the custom springs I am getting have the possibilty of falling right out of my car. Seeing I am making my car safer than factory I am going to make a setup that limits the drop of the diff. It looks like I will be using stainless rods mounted to the body with a slider on the diff housing. When the car body goes up past a point the nut on the bottom of the shaft catches the slider on the diff and lifts it. So tottaly captive springs and tottaly legal, perfect.
    30kw club

  3. #13
    Elite rthy's Avatar
    Join Date
    Dec 2008
    Name
    Leo
    State
    VIC
    Location
    Tulla
    Country
    Australia
    Posts
    7,308

    Default

    I dont have any factory trumpets and I don't plan on losing any power, infact I plan to gain some by changing them, heres number one of four of what I am making to replace them:


    to fit inside the airbox I will use mandrel bends, it will look bizarre but it will work.

    I have seen results of a test that showed that the air flow difference between a full bellmouth and a flare is 3%, so for now I will use this.
    30kw club

  4. #14
    Elite rthy's Avatar
    Join Date
    Dec 2008
    Name
    Leo
    State
    VIC
    Location
    Tulla
    Country
    Australia
    Posts
    7,308

    Default

    UPDATE: Now that I have finished this part I can say now that what I did below DID NOT work. The calipers hit the body but I will still show this in the interest of showing what else I did.


    Well that asside this is how I setup my soon to be brake setup, I used the following:

    * T-18 diff
    * new ST142 180mm brake disks
    * Ae-82 brake calipers (same as AE-92)


    I did some work on my T-18 diff with good sucess. In the previous week I took the drum brakes bits off and then with some help pulled the axels out. So after taking it apart I ended up with this:


    No drum assembly or mounts only the housing, axel and retainer plate. Next I took the old drum backing plate and chopped a peice of the center that is just a bit bigger than the housing, like so:


    I need to put these peices back in as they are required to get the right spacing to all for the crush on the bearing, also in the pic is the shim that adds to the right thickness. After cleaning it up I put it back in with the shim and some gasket sealer and then bolted it back together. Heres how it turned out:


    With a quick spray of black paint it looks factory, which is exactly the look I am after. From here I fitted the disk on and modified the ae-82 brake mounts to slide over the housing, which turned up to be an exceptionally easy job. Heres how it looked as a dummy run:


    The cardboard is placed between the caliper and the round part of the disk for vertical spacing and the center punch that has been jamed in there manually puts the handbrake on to hold it in the right position. From here I did some tack welds to hold it in. Repeating the process again it turned out pretty good I think:


    I am going to have to do get some new custom metal brake lines made up for the diff, which will be cheap and then I will do a dummy run in my car to see that all the clearences are ok. Only then will I do proper welds and bracing of the mounts. I probably should change my brake master cylender too, because this might cause the master to push so far that its goes past what its designed for and then leak.

    I also put a rim that came off my Corolla onto the diff with the brakes installed and although the caliper is set so far back it only clears the rim by a single centimeter. I hope my Sprinter rims and also my spare wheel will fit over ok, they should though. Once on my car they should look very interesting indeed.


    oh yeah and so far it has cost me this:

    $100 - T-18 diff with adjustable panhard rod
    $30 - Rear half of the T-18 tailshaft of the install
    $130 - Brand new brake disks
    $50 - Calipers

    so so far its only $310 for a disk brake rear end thats compatable with a Zenki LSD that I am trying to get.


    I have been quoted around $20 for the metal lines and I will probably need 2 elbows and 2 reducers so make that another $10. The diff center should be around $800 to $1300. So if its $1100 I should cost me a total of $1450.


    Now the standard price for a genuine Trueno diff is $2000, that includes a weak and probably worn out 1-way LSD and disk brakes that are the size of CDs and also probably worn out. I on the other hard have spent hundreds less and would have new disks that are bigger than what almost all 86's have as their front brakes, a new 2-way LSD diff center, thats stronger, longer lasting and has a rebuild kit available for it, and would use common parts to do it all, so spares are easy.
    30kw club

  5. #15
    Elite rthy's Avatar
    Join Date
    Dec 2008
    Name
    Leo
    State
    VIC
    Location
    Tulla
    Country
    Australia
    Posts
    7,308

    Default

    I managed to finish making my own water pipe plate for the back of the head, it took quite a while and looks like this:


    the top one is what came with the engine when it was already converted and the bottom is mine. Mine may look rougher and be marginaly heavier but would easly outflow the other one, tottaly un-necessary I am sure but I am a fussy guy. Today I also managed to make some of my top water pipe. What I did is use a flange I made previously and then very tediously chopped small slices out followed by alot of welding and grinding to get the right shape. I will have it as a fixed pipe bolted to the block. I will also fit a heat sheild in due time to stop my extractors boiling the water more. Pic coming soon.


    heres a dodgy pic of what it looks like on the engine:


    Added later on:

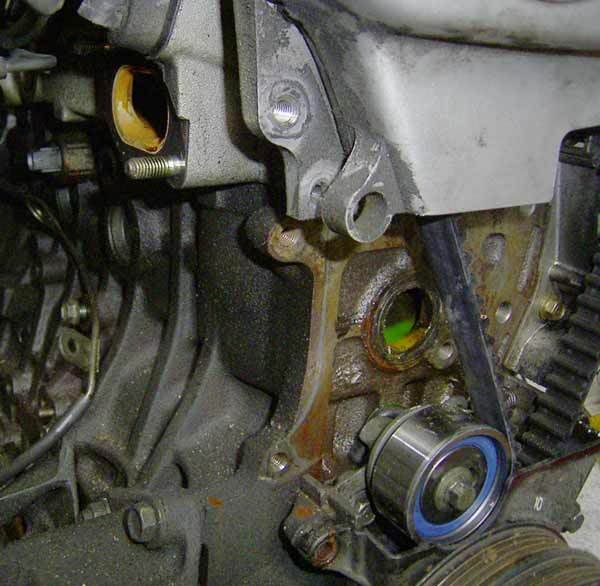
    Today I started making a tottaly new setup for the cooling that doesnt require any cross-over pipes, so basicly I have wasted my time so far, great! The information I got requires the use of a RWD water pump so I tried using a single cam one (4AC).

    Anyway down to it: I took my stock water pump off and this is how it looked:


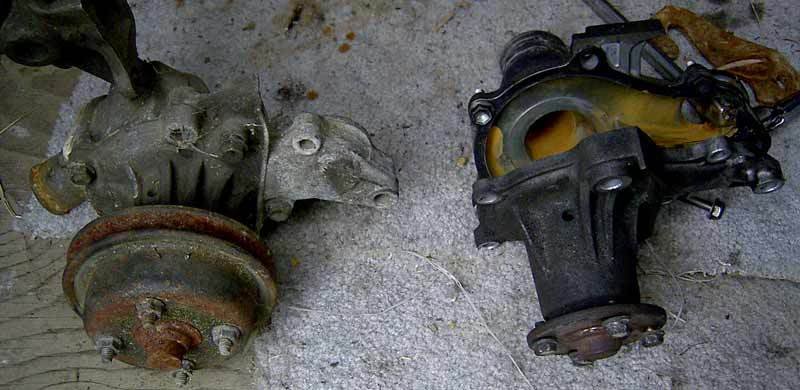
    I found a spare pump sitting in my back yard in the weather, it had been there for many years, needless to say time hadent treated it well, heres it alongside the 20V one, notice how the 20V one has no provision for a thermostat (right):


    I took it apart and found a huge black spider waiting for me, that found itself inbeded in the cracks of soles in my steel capped boots. I found a broken bolt which I drilled out out and tapped and I also disassembled the housing. From here I cleaned it up with some acid based mag wheel cleaner which worked wonders. I decided to get a new front assembly if this works out so I didnt clean it.


    Once I took the top section off it fit nicely onto the engine:


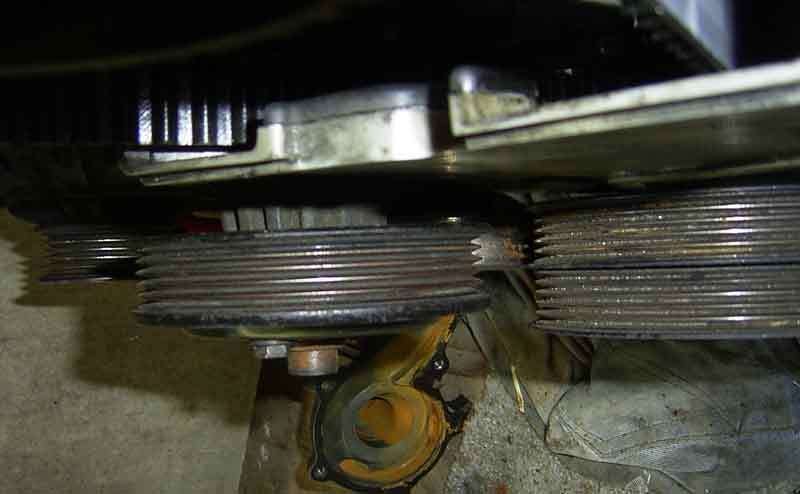
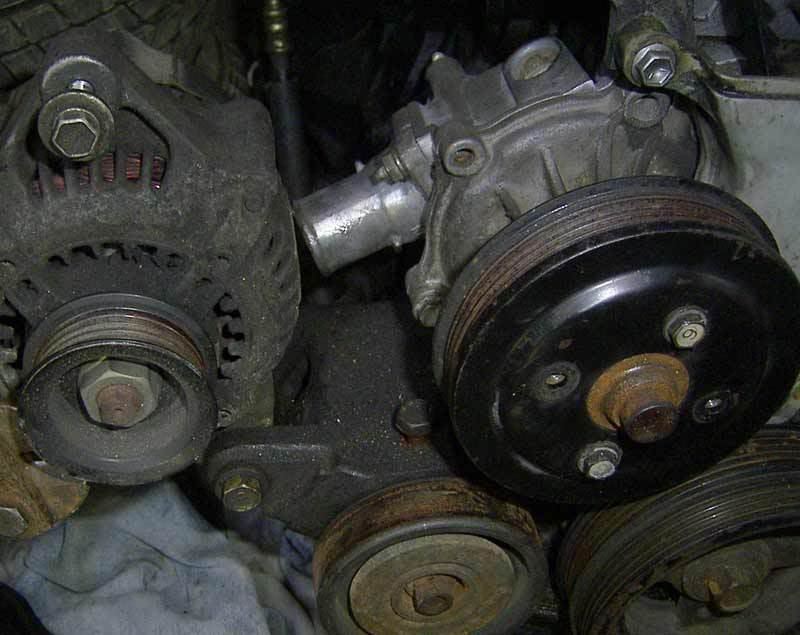
    After doing this I fitted the pulley off the 20V and I found I had a problem:


    and that was that the pulleys didnt line up, I will consider my options from here, a custom pulley seems to be in order. I have been told though that theres 2 versions of shafts on this pump so I will see whats around.


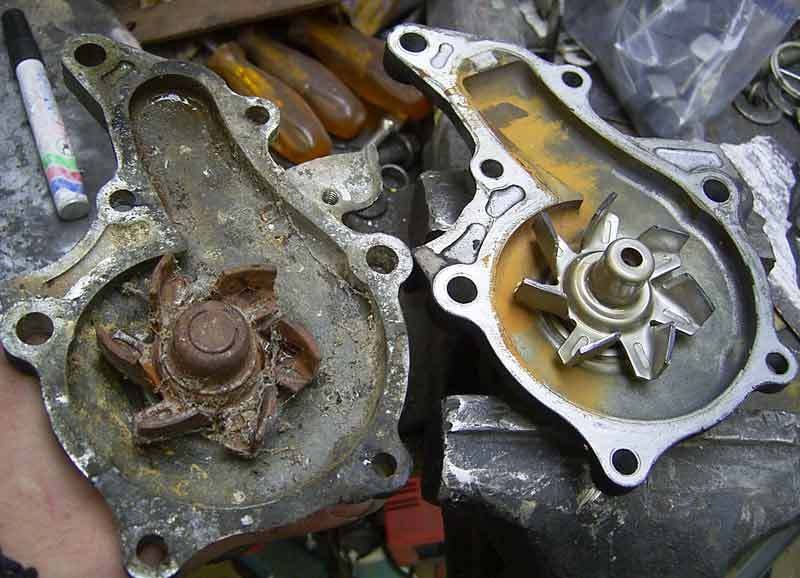
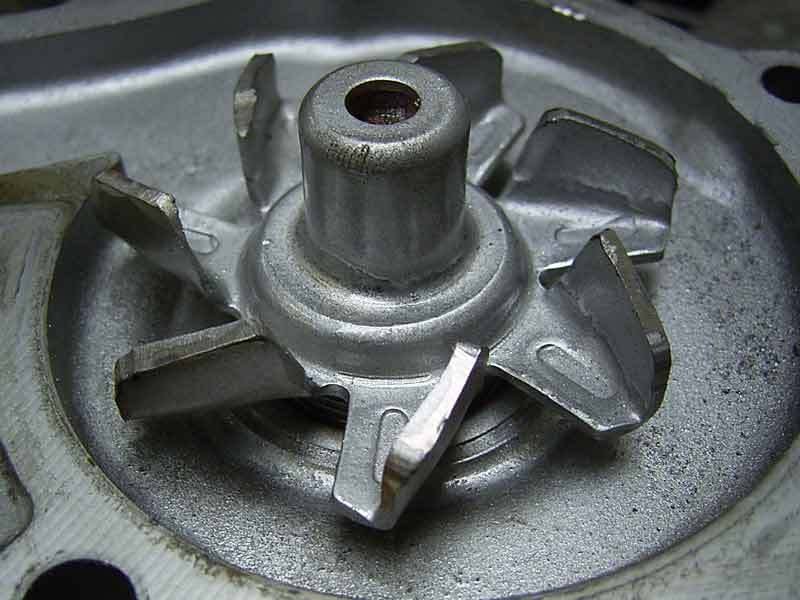
    well with my friend Gavin's idea I tried to solve my water pump problem with using the front asemebly off the 20V and the rear housing off the 4Ac. Now the 20V has one extra blade on the impellor however I found this to be irrelevant. Heres how they looked:


    Fitting the two together I found they came within about 1mm flat from fitting. So I very carefully ground down the impellor blades on the 20V water pump. This was a bit tricky as one big slip and it would be the sealing ability of the housing. After taking a bit off I would paint it silver, and rub it against the rear housing which was black to see where the high spots are. Folowed shortly by more grinding. Soon enough the two fit together nicely and I purposefully kept it a close fit for efficiency reasons. The original blades are further into the housing so by grinding the 20V ones to suit I had a reduced surface area to push water. However I think this would be compensated by the fact that I has reduced the tollerances betwen the blades and the housing from about 2mm to next to nothing. Also add to that the extra blade and if that wasn't enough my Hyundai radiator would make short work of any extra heat if there was any. This may even have the benifit of less power losses in turning the pump. Anywya heres how the blades ended up looking:


    Now that thats been done look at how the bottom outlet faces staright into the dise of the alternator:


    So it's time to make a custom alternator mount and some piping.
    30kw club

  6. #16
    Elite rthy's Avatar
    Join Date
    Dec 2008
    Name
    Leo
    State
    VIC
    Location
    Tulla
    Country
    Australia
    Posts
    7,308

    Default

    Also today I readjusted my front suspension, I raised the height of the front to make it oversteer less, as a bonus I can now roll a coke can under my car without it hitting the exhaust.

    The result of my tweaks is that the car is now about 1.5 cm higher in the front and it still oversteers a bit but its much better. I can't wind it up more because I will lose too much turn in response. I hope to gain some of that back which I lost when I add some negative camber. Perhaps then i will be able to make it handle even more neutral and still have an as good turn in.


    A downside though is that while I did it at a friends I was testing my car in a residential area (under the speed limit) and I upset one guy because I went a bit fast around a corner next to his house. I will be doing that stuff somewhere else from now on or during a time when theres no-one on the roads but me.


    Heres some stuff I have worked on prior to this forum:


    My custom center console. This car comes standard with a double din hole, or something close to it. So what I did is cut up a stainless plate to fit ontop, cut out the hole in the middle for the face and then covered it. I love the finish and its sturdy too. The way the head unit is held in is a different nighmare altogether. I might take a pic of that soon. I think I am going to have a P.H.D is fidely crap when I am done with this car.


    This was put in my car when I was getting it ready for my turbo 4agze conversion, it's still there though and will be untill I get an oil-temp gauge to replace it. This is far from a standard mounting job too, the cup was from Speco and the gauge was from Autometer, both 2 5/8 but slightly different sizes, so it didnt fit. I ended up cutting a slot in the side and having a tiny bolt to clamp it to compensate. I also got a friend to tig weld a mount on I made and I had it painted. This is also light but very solidly mounted.


    Next up is my "WTF was I thinking?" parcel shelf, a project that has collected dust for a while now, I will get back to this in due time. Here it is the strangest parcel shelf for a Sprinter ever!


    I will soon also show my short shifter and revisit my parcel shelf for more work.


    another mod from a while back:


    this is my short shifter. Pretty crude really but works better than what you may think. This was off my corolla T-50 I had spare. I basicly chopped the vibration insulator out and then welded in the shank of a bolt to get the height back up. Doing some driving I found that I had to strech my hand way too far for 1st and 3rd so I cut it again and welded it in on an angle, in the pic its in neutral so it shows how much its be moved towards me back and to the right. After doing that I found it suits me perfect, it stays clear of the hardbrake along with everything else. I think it feels really good, so much so I would stil want this even if I liked to make slow gear-changes. The reaction I have had from people who have tried it has been simular. The only downside is that without the vibration insulator I get more force though my hand, I occasionly feel it jar my hand with a particully vicious gearchange. I am hoping a nice leather gear knob will help a bit there. But all in all it's a minor issue.


    and something a bit more recent:


    This is a photo of my unfinished boss kit that I made myself, I am currently using it and the only thing it needs is a peice of 3.5 inch pipe to be welded on as a shroud to hide the horn holes, cables, etc... Since the photo was taken I have since wired the horn in and obviously attached the wheel. Notice the base where I am using the original (well a corolla original) plastic plate with the brass ring, this is to keep the horn running. To make this I chopped the center out of my old Corolla wheel and machined it down in the lathe at work when no-one was looking, welded a peice of pipe, made my eloborate flange and welded that on. When I get that 3.5 inch pipe i will take it off again and weld that on. In the meantime however it works great, would be almost indestructable while still being very light and still lets the horn work. I know this is an unsual thing to make but it has worked out well so far and besides I made this during a few quiet times at my work

    Heres a pic of my steering wheel with the half finished boss kit, the steering wheel center wasnt made for it but some simple mods fixed that.


    notice also my 4 piston cross-drilled keyring in the ignition
    30kw club

  7. #17
    Elite rthy's Avatar
    Join Date
    Dec 2008
    Name
    Leo
    State
    VIC
    Location
    Tulla
    Country
    Australia
    Posts
    7,308

    Default

    and more parts again:


    Here I converted my own traction and pan-hard rods. I don't think I will end up using the traction rods so if someone wants them for a small price let me know. I will probably make up a few more pan-hards for my friends as well. Right now I am using an adjustable pan-hard that came with my T-18 diff but I will fit one of my own because it will be metric, look better and I will just be able to say that I made it. For both I used grade 8.8 threads and nuts, and the rod joiners are grade 5, the threads are 20mm for the traction rods and 16mm for the pan-hard so I won't have to worry about any of these ever snapping on me.
    30kw club

  8. #18
    Elite rthy's Avatar
    Join Date
    Dec 2008
    Name
    Leo
    State
    VIC
    Location
    Tulla
    Country
    Australia
    Posts
    7,308

    Default

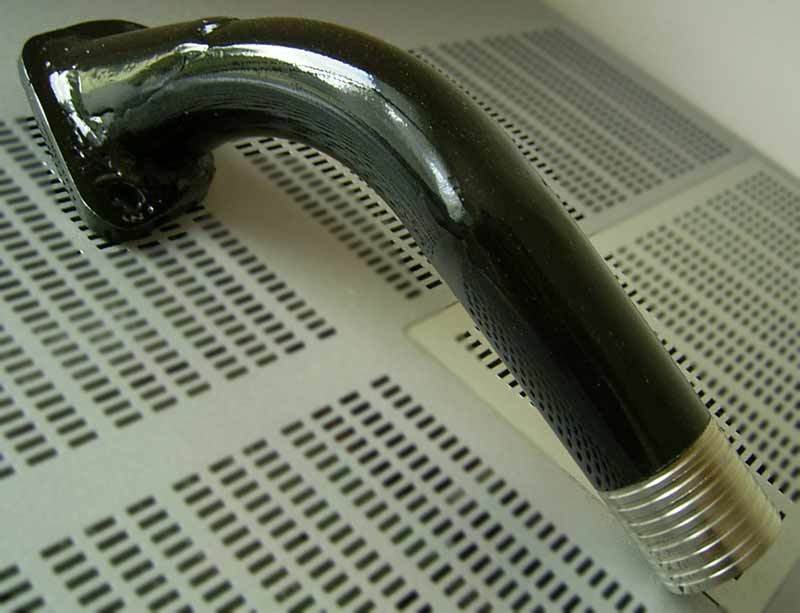
    I almost finished my outlet pipe:


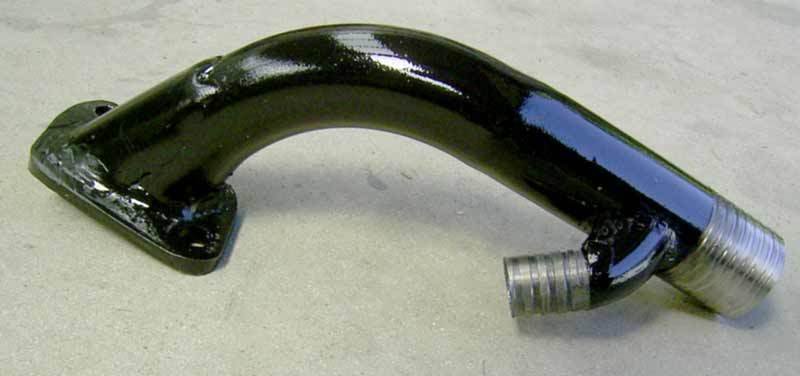
    now all I need to do is drill a hole and weld on the pipe that suits the thermostat bypass water. It turned out better than expected and fits on the engine real nice (pic soon). I cut the flange myself, used a peice of bent pipe from a truck mirror mount welded to a peice of exhaust that I machined grooves into to seal the water. The outlet on the head was an oval shape so I welded on one pipe and then used a second peice welded on on an angle to cover the hole and provide unrestricted water flow, this was not an easy job but turned out good enough.


    Now a question for the ae-86 gurus who read this:

    -What is the stock redline cutoff?

    -whats a place that the body bends in an adverse way to handling? apart from the strut towers?


    and I did even more mods to my water pipe:


    I tried to take a pic of it on my engine but I dont have enough light at any time of the day it seems. I will try again soon.


    I also finished my custom alternator bracket:


    I used the tensioner off a ST-141 Corona and used a 90 degree angle that bolts to the far left extractor mount bolt. The only mods I did to the tensioner is a welded nut to the end of it for easy adjustment. It looks a bit crude but is very light, simple, looks factory and should work really well. I also bolted the alternator up from the reverse side. When I made the lower mount I used a few washers to simulate the width of the engine mount that it would have to fit over, so when I put it together it should go together nicely.
    30kw club

  9. #19
    Elite rthy's Avatar
    Join Date
    Dec 2008
    Name
    Leo
    State
    VIC
    Location
    Tulla
    Country
    Australia
    Posts
    7,308

    Default

    QUICK UPDATE: I finally have the chance to take my car off the road for 3 weeks and I have already dropped the diff. I will be fitting my T-18 diff shortly and I will determine if the position of the calipers is ok, so far it's looking good. If good I will take it out again, weld it up properly with braces modify the housing and then get some custom metal lines made up to hook it up.

    I want to extend the brackets for the lower control arms, so instead of getting traction brackets I will just have modified mounts instead. This will have the advantage that mine will be lighter, stronger, simpler and look factory compared to profesional traction brackets.

    I also want to weld a set of cups around the bottom spring seats to possitively locate the spring, shouldnt be needed in theory but I have found that they can be.

    another update: Looks like I have received some bad info, AE-82 calipers WILL NOT fit onto a normal t-18 rear end with corona disks. There just isnt any room for it. It may be possible if the car was like a standard unsagged height which is bloody high, the mechanical handbrake was removed or the lower arm was moved. Lucky for me I needed to drop my trailing arms to correct for the lowering and I did this by cutting the mounts off flush from my Sprinter diff and then welding them on the bottom of my T-18 ones bringing the pivot point closer to the ground. This enabled me to have more room for the caliper mechinism and I looks that with a bit of a cut out of the body it might fit. its a risk though.

    This definetly isnt an easy conversion.


    UPDATE: I have managed to fit my ae-82 calipers, ended up massaging the body a little in one spot, lowering the trailing arms for the suspension, modifying the hand-brake cable mounts and I am getting custom metal lines made. i will get some pics as soon as I get my hands back on my camera in 2 weeks.


    I tried this setup with my T-18 diff and with the standard shocker mounts. I dragged out my old stuffed OEM shockers for testing purposes. The caliper doesnt even come close to fitting because the handbrake mechinism doesnt have room at all. I also found out that my commodore shockers have a significantly longer stroke. Anyhow I am going to ditch my custom mounts and instead get the standard bush pressed out and replaced with a normal bush. This will allow me to run the standard mounts. I didn't want to do this before because I didn't want to mess with my shockers for warranty purposes seeing I wasn't sure if they would work for me and they were bloody expensive. I just need to find out what bushes to use, the standard sprinter ones have a too small outside diameter. Not that any of this matters anymore I have with alot of work managed to fit ae-82 calipers on, problem solved. I feel sorry for anyone that even comes close to trying to copy me on this one though.

    Heres a working to people, don't attempt to use ae-82 calipers, I made it work but it was very hard.
    30kw club

  10. #20
    Elite rthy's Avatar
    Join Date
    Dec 2008
    Name
    Leo
    State
    VIC
    Location
    Tulla
    Country
    Australia
    Posts
    7,308

    Default

    Managed install my custom king springs in the back, their a little low so I am going to fit some rubber spacers to lift it a little.

    I also did do some work to my new exhuast with the help of Kev (phrostbyte), him holding the muffler in position made things increadibly easier. This time I did things even better there isn't a single burr, welding bubble, nick, pit or step in the whole system. Looking down inside it all that can be seen are lines where the pipes join and that's it, this is why I do this stuff myself. I also took to the inside edge near the exit of the stainless muffler because it had a burr and I took that right down, overkill maybe but hell I do it because I can. I took special care to make it hug the body really close and I made it so that if I took my springs and bump stops out the diff still can't hit the thing, well thats the plan anyway..


    Heres a half way pic:


    theres 8 peices right there and while it looks so simple it sure isn't. Anyhow I am happy with how it's turning out and how it sits in there. I had to stop because I didnt have a resonator to weld in and I needed it to continue. I will order the longest one I can because there's a suprisingly large amount of room under there for one and I will make sure that it's very close to the body because otherwise it will cop a bashing. I as for the flanges and mounts I will add them last.


    I worked on changing how my spare wheel sits in my car today. Previously I thought it was stupid that the original setup had the spare wheel sitting proud of the recess that was in the car for it, so I changed my OEM spare to a space saver. These are apparently available from S13 model silvias and 180s, later models I have been told have a larger outside diameter so they arn't much good. Anyhow the one I got fitted looked like it was made for it:


    today I quickly made up a thin MDF cover (8mm I think) to go over it. Heres how it ended up looking:


    Now when i sit the carpet down the floor is completely level which is great. It also makes things so much better when i make a high tech light-weight subbie box.

    I also plan to cover this board with something or paint it black, but I will do that when I have done more important things first so it sure as hell won't be anytime soon.


    Here's another project from a while back:


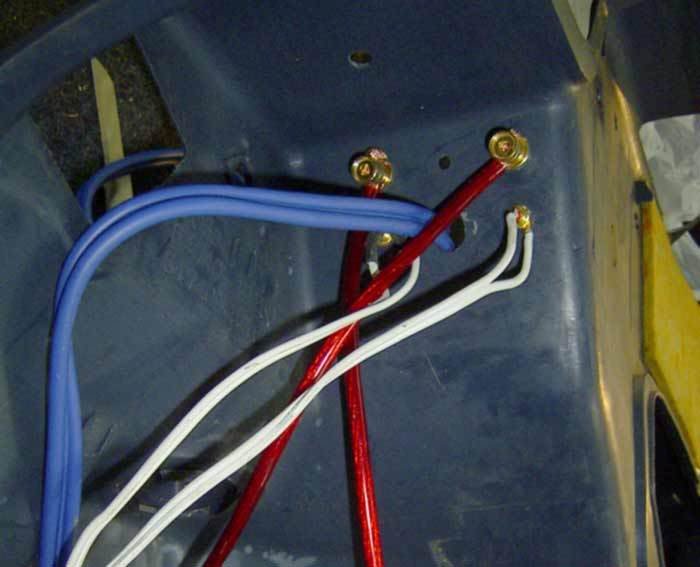
    What this is is a setup to have a fully modular rear sound system. This photo was taken when I had my passenger side parcel shelf removed just before I replaced it. The theory behind this one is that I want to have rear speakers and a small subbie but I want to be able to remove them in under a minute to fit my bike in if I want to do so. So I went for this system that uses plugs for everything. The Parcel shelf will unclip physically and the wires all unplug in moments, heres what I used to do it:


    These are as follows:

    [Power + ].........[]........[Power - ]
    [R speaker]...[cables]...[L speaker]

    In my hand is the connection for the RCA inputs into my amplifier and also the remote power on for it. The fork lug on the end of the remote wire stays in the amp and when I want uplug it it's done at the red RCA plug and socket in the middle of the lead. The Sub-box has the amp screwed to it and are obviously removed together. The amp has 2 short leads also permenently wired in for power and both of those have bannana plugs attached to the end so even the power is able to be unplugged, also bannana plugs by nature allow a decent amount of current to pass through them, I chose gold plated models to help further.


    heres how it looks when its pulled out from the inside:


    I did however end up shortening the ground wire and it was joined to the body as close as possible. I drilled a hole though the metal seat mount support and sanded it back to have good contact.
    30kw club

Page 2 of 25 FirstFirst 1 2 3 4 5 6 7 8 9 10 11 12 ... LastLast

Similar Threads

  1. Parting out: Silvertop 20V AE71 Spirit project - Pics added
    By beerhead in forum Car Parts For Sale
    Replies: 20
    Last Post: 31st July 2007, 03:50 AM
  2. tech question: DIY 4age cut n shut inlet manifold?PICS
    By slidn70 in forum Technical - Questions
    Replies: 2
    Last Post: 20th June 2007, 01:56 PM

Posting Permissions

  • You may not post new threads
  • You may not post replies
  • You may not post attachments
  • You may not edit your posts
  •