Page 6 of 16 FirstFirst 1 2 3 4 5 6 7 8 9 10 11 12 13 14 15 ... LastLast
Results 51 to 60 of 159

Thread: track only car

  1. #51
    Senior Member H8CHIR6KU's Avatar
    Join Date
    Dec 2008
    Name
    Aaron
    State
    WA
    Location
    Perth
    Country
    Australia
    Posts
    987

    Default

    for the outlet on the back of the head i used one that was made by sam q.


    this is the photo of the top hose outlet and water pump with 4ac pipe bolted on the back of the pump.
    this photo also shows why i used sams outlet instead of the rs chita one. the barb on sams outlet is the same size as the 4ac pipe. because i am not running a heater the rs chita outlet is a pain in the ass to set up. sams one with flow the same and means i only have to use one hose. as its a track car this is simple and means less to go wrong.


    this is with the hose on. i did use a double clamp on the hose onto the pipe only because i had to cut it a little short which meant no rolled lip on the pipe.

    and this is the whole setup complete. it really is simple and straight forward and shouldn't cause me any dramas.
    Last edited by H8CHIR6KU; 3rd May 2009 at 03:55 PM.

  2. #52
    Senior Member ae86=fun's Avatar
    Join Date
    Dec 2008
    Name
    Tobias
    State
    TAS
    Location
    Battery Point
    Country
    Australia
    Posts
    154

    Default

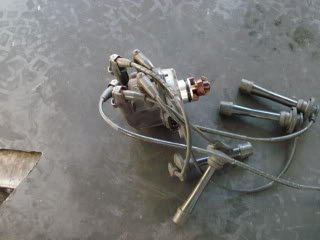
    sexy hand model you have there hahah.

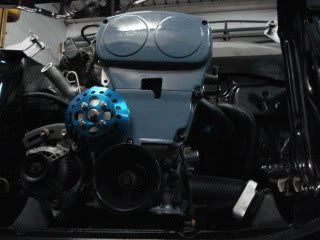
    As a side note: The factory solid vac lines had to be removed to fit the top outlet, and have been replaced with a vac lines linking all the intake runners for a simpler layout.

    Its going to be fun getting it off the hoist, considering it doesn't touch the ground.

  3. #53
    Senior Member H8CHIR6KU's Avatar
    Join Date
    Dec 2008
    Name
    Aaron
    State
    WA
    Location
    Perth
    Country
    Australia
    Posts
    987

    Default

    as toby has said i did a bit of fucking around with the vacuum lines to make it all work.

    first off i changed the 4th throttle barb with the first throttle barb.

    i did this because the brake booster hose will be easier and neater to fit if its all aiming the same way. i just blocked off the 1st throttle barb as i dont need it.

  4. #54
    Senior Member
    Join Date
    Dec 2008
    Name
    Brandon
    State
    QLD
    Location
    Blackwater
    Country
    Australia
    Posts
    307

    Default

    that is sooo sexy.
    looks like a nice build coming along.
    cant wait to see finished product ay

  5. #55
    Senior Member H8CHIR6KU's Avatar
    Join Date
    Dec 2008
    Name
    Aaron
    State
    WA
    Location
    Perth
    Country
    Australia
    Posts
    987

    Default

    as for the vacuum lines from under the throttles i used 5mm t pieces and 3mm vacuum line and joined them all together and ran them with the filters to the outlet above the 4th throttle. it seems this is eventually where they lead up to in the original position anyway. it will also act as a sort of balancing chamber for the throttles too


    then for the dashpot and map sensor i used the same vacuum line and t piece and ran them off the 4th throttle vacuum barb.


    the finished product^^. i also swithed around the fuel hose so that it goes straight down instead off at 90 degrees. to mount that to the filter i just cut off the locating tab
    Last edited by H8CHIR6KU; 3rd May 2009 at 04:21 PM.

  6. #56
    Moderator Sam-Q's Avatar
    Join Date
    Dec 2008
    Name
    Sam
    State
    VIC
    Location
    Endeavour Hills
    Country
    Australia
    Posts
    4,242

    Default

    its looking good but I believe you have made a mistake. That barb off the bypass backing plate is connected to the same channel as the top radiator outlet (the nice one), the steel pipe connected to the block is directly connected to the bottom outlet. So I think what you have setup is a radiator bypass and hence I think your engine will run pretty hot. Now to fix this is really easy, you just need to block both ends. If you like I will happily swap your rear bypass block for one without a heater barb in the side for free if you mail it back to me. For the pipe I guess now is a good a time as any to mention 2 new products I havent released yet as I just finishing making them. They bolt in the place of the original pipe on the back of the water pump and are either a blocking flange or a flange with a barb. I will take a pic of one of these block off plates and show you. That means you can get rid of one more hose and a pipe top make your already neat engine look even better.
    My website: SQ Engineering - 4AGE and 3SGE upgrade/replacement parts

    - SQ Engineering on facebook -

    Please e-mail to contact me instead of sending a private message on here.

  7. #57
    Senior Member H8CHIR6KU's Avatar
    Join Date
    Dec 2008
    Name
    Aaron
    State
    WA
    Location
    Perth
    Country
    Australia
    Posts
    987

    Default

    hey sam, i was speaking with my friends about this and we all have different views on this. i was thinking more along the lines that cold water is drawn by the pump through the bottom outlet, and then pumped through the front of the block and also through the pipe on the back of the water pump. this would mean that it would flow cooler water through the front of the block and also to the back of the head. after this it would then flow through the top hose outlet into the radiator.

  8. #58
    Veteran ae86hachiroku's Avatar
    Join Date
    Nov 2008
    Name
    Ken
    State
    WA
    Location
    Spearwood
    Country
    Australia
    Posts
    1,586

    Default

    I've seen you eyeing that last time at Aarons, sure enough it'll be in your car as well soon? hehehe

  9. #59
    Senior Member H8CHIR6KU's Avatar
    Join Date
    Dec 2008
    Name
    Aaron
    State
    WA
    Location
    Perth
    Country
    Australia
    Posts
    987

    Default

    well onto other matters...

    as i am using an adaptronic i wont be running the cap and leads on the distributor but i will be needing the crank angle sensor. so i purchased a cover off of anthony at kaizen garage.


    fairly straight forward, just remove the cap and rotor and fit the cover using the bolts from the cap. replace the o-ring and fit to the original position

  10. #60
    Senior Member H8CHIR6KU's Avatar
    Join Date
    Dec 2008
    Name
    Aaron
    State
    WA
    Location
    Perth
    Country
    Australia
    Posts
    987

    Default

    after all that i decide it was time to put the motor in.


    it looks good in the pictures but it looks absolute porn in person

Page 6 of 16 FirstFirst 1 2 3 4 5 6 7 8 9 10 11 12 13 14 15 ... LastLast

Similar Threads

  1. Replies: 54
    Last Post: 7th July 2012, 11:46 PM
  2. 4AGTE 20Valve track car Fast fours feature car :)
    By ke70drift in forum KE70 / AE71 Owners Forums
    Replies: 62
    Last Post: 27th May 2012, 11:18 AM
  3. Track car part out
    By flex in forum Car Parts For Sale
    Replies: 7
    Last Post: 24th February 2011, 11:01 AM
  4. [QLD/NSW] WTB: Car trailer for track car
    By keiichi in forum Cars or Parts Wanted
    Replies: 2
    Last Post: 22nd October 2010, 06:42 PM
  5. (SA) Cheap ADM 86 for project car or track car use...!!!
    By dasini in forum Cars for Sale (Toyota Only)
    Replies: 21
    Last Post: 13th April 2010, 03:15 AM

Posting Permissions

  • You may not post new threads
  • You may not post replies
  • You may not post attachments
  • You may not edit your posts
  •